If you're using VirtualBox as your favorite virtualization product, you may have heard or noticed that virtual machines you install can be boosted with Guest Additions. When installed, the Guest Additions tools allow your guests to run faster and better, to share mouse and clipboard with the host, to use the Shared folders, and more. All in all, a highly useful … addition. So we will learn how to use them.

Guest Additions are similar to VMware Tools for VMware Server / Workstation. In fact, I most warmly recommend you read the first tutorial, which explains how to install VMware Tools on Windows and Linux guests.

Today, we will see the similar tutorial, focusing on Sun's VirtualBox.

For much more information about virtualization, I most warmly recommend you read my entire Virtualization section.

Follow me.

Install Guest Additions on Windows guest

The procedure is very simple. Just boot into your guest. Then, in the VirtualBox menu, under Devices, click Install Guest Additions…

Guest addons

The same like VMware Tools, this will popup a wizard in your guest. Follow it through, reboot and enjoy.

Setup

After you restart, look for the VirtualBox icon in the system tray.

Icon

Simple, isn't it?

Install Guest Additions on Linux guest

Again, a fairly simple procedure. Repeat the first step. This will mount the VirtualBox Guest Additions ISO (included with the program) as a CD-ROM drive inside the virtual machine.

A file manager windows might popup, depending on your guest configuration, showing all the available options, including Guest Additions for both 32-bit and 64-bit systems, Windows and Linux alike – and even Solaris, not surprising, considering VirtualBox owned by Sun. On most modern Linux distros, the system will auto-mount CD-ROMs and launch file browsers / managers.

Addons in Linux

Choose the right package for your hardware architecture. In our case, this is x86. Open a terminal window and run the script with root privileges:

sudo sh ./<script-relevant-for-your-architecture>

See image:

Run

Wait a few moments until the installation is complete. Reboot.

Installed

And that's it!

Extras (missing Guest Additions)

This extra section is necessary, because sometimes people have trouble finding the Guest Additions!

In general, whenever you click Install Guest Additions …, VirtualBox is supposed to mount the Guest Additions ISO. But this may not happen. There are several ways to rectify the situation:

First, if the Guest Additions are not found, VirtualBox may prompt you to access Internet and download the ISO file. You only have to do this once. Unfortunately, I do not have a screenshots to share on this one.

Alternatively, you can download the image yourself and then manually mount it as a CD-ROM, under the Settings for the particular virtual machine.
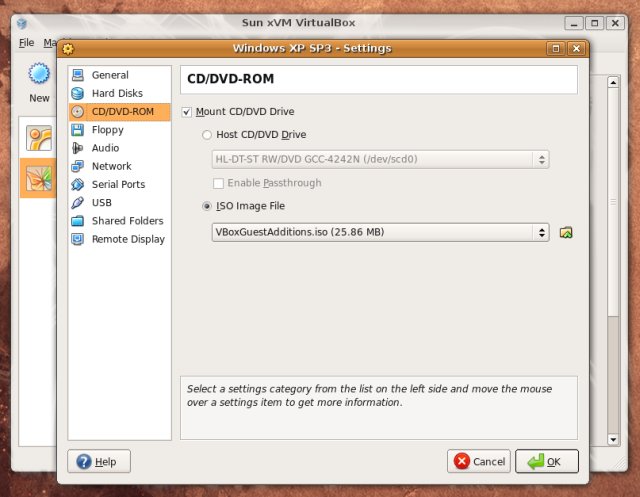
Mount ISO

Then, the next time you launch the virtual machine, the Guest Additions will be mounted as a CD-ROM. To install the Additions, on Windows, double-click the executable; on Linux, run the scripts as demonstrated above.

Mounted

From here, you're on common grounds.

Conclusion

The installation of VirtualBox Guest Additions is even simpler than VMware Tools. Then again, so is the installation of VirtualBox. Either way, the procedure is simple and fast and rather painless. Minimal tinkering with the command line is involved.

Now, you have also learned how to master VirtualBox so that you can benefit most from your guest machines.

Hopefully, this article, as well as the VMware Tools guide, help clear some of the mist. This way, we can move on to more complicated things. Hint: in the next articles, we'll talk optimization, bridged networking … and even 3D acceleration? Stay tuned.

Cheers.

012010

今天无意中发现的,非常实用。

1,修改你的源,并升级到最新的系统,这个最最基本的,必做(如果感觉很麻烦,就用优化软件来做):

1
sudo gedit /etc/apt/sources.list

在编辑器里,删除所有东西,并在加上下面的行,建议安装Ubuntu Tweak来修改就不用使用命令了: 最新的163做的源,9.04的

1
2
3
4
5
6
7
8
9
deb http://mirrors.163.com/ubuntu karmic main restricted universe multiverse
deb http://mirrors.163.com/ubuntu karmic-security main restricted universe multiverse
deb http://mirrors.163.com/ubuntu karmic-updates main restricted universe multiverse
deb http://mirrors.163.com/ubuntu karmic-backports main restricted universe multiverse
deb http://mirrors.163.com/ubuntu karmic-proposed main restricted universe multiverse
deb-src http://mirrors.163.com/ubuntu karmic main restricted universe multiverse
deb-src http://mirrors.163.com/ubuntu karmic-security main restricted universe multiverse
deb-src http://mirrors.163.com/ubuntu karmic-updates main restricted universe multiverse
deb-src http://mirrors.163.com/ubuntu karmic-backports main restricted universe multiverse

听说souh也出了源

deb http://mirrors.sohu.com/ubuntu karmic main restricted universe multiverse
deb http://mirrors.sohu.com/ubuntu karmic-security main restricted universe multiverse
deb http://mirrors.sohu.com/ubuntu karmic-updates main restricted universe multiverse
deb http://mirrors.sohu.com/ubuntu karmic-backports main restricted universe multiverse
deb http://mirrors.sohu.com/ubuntu karmic-proposed main restricted universe multiverse
deb-src http://mirrors.sohu.com/ubuntu karmic main restricted universe multiverse
deb-src http://mirrors.sohu.com/ubuntu karmic-security main restricted universe multiverse
deb-src http://mirrors.sohu.com/ubuntu karmic-updates main restricted universe multiverse
deb-src http://mirrors.sohu.com/ubuntu karmic-backports main restricted universe multiverse

2, 安装输入法,你可以在SCIM和fcitx输入法中任选一种安装(强列推荐fcitx)

1
2
sudo apt-get install fcitx
im-switch -s fcitx

3, 安装更好的多媒体mp3播放驱动:Audacious , 它比xmms要爽,最好用的,还可以换皮肤(见我另外的文章)

1
sudo apt-get install audacious w32codecs

解决歌名列表乱码问题:直接在播放列表中选择chinses.方便吧

5.安装各种视频(rmvb,wmv等)播放器,我安装的是smplayer,他是mplayer的前端

1
sudo apt-get install mplayer smplayer w32codecs

6.sudo 时不需要输入密码和vi使用方向的问题

1
$sudo vim /etc/sudoers

根据你的用户名加入下面内容

1
username ALL=(ALL) NOPASSWD: ALL

然后按wq!强行退出和保存,然后用户注销在进入就行了,记的,这行加在最后面

7, 安装bt软件(azureus)

1
sudo apt-get install azureus(现在不推荐了)

发现了更加好的”奔流”
软件论坛:http://groups.google.com/group/benliud获取,真是太快了,太好用了

8, 安装编译工具包: build-essential(你想重新编译什么的话,我现在很少用到)

1
sudo apt-get install build-essential


9, 安装unrar(这个太常用了)

1
sudo apt-get install unrar

10.Firefox插件(现在和自动安装功能很好用)没有插件的Firefox就是一个裸奔的IE.

Firefox常用,常用插件
Super DragAndGo
Adblock_plus   广告在线屏蔽
Fasterfox         firefox速度优化
MediaWrap     在线播放关联
DownThemAll  firefox多线程下载
Xmarks            在线书签同步备份
新同文堂           中繁字体转换
ScrapBook       文章网页内容抓取
Prism                建立web 的程序成独立程序
Personas        修改优化Firefox的外观
Firebug          网页开发使用
HttpFox          不错的http头显示的…不象IE的,还要收费

为firefox增加baidu搜索
打开http://mycroft.mozdev.org/download.html.然后搜索框中输入baidu,然后在结果中点击“Baidu (百度)”,弹出的对话框按“确定”即可。

Ubuntu9.04中firefox3.5是默认是英文版本,所以都是英文的菜单。可以到下面地址下载中文语言包,之后重启一下就可以了。

http://releases.mozilla.org/pub/mozilla.org/firefox/releases/latest-3.5/linux-i686/xpi/zh-CN.xpi

下载 zh-CN.xpi安装

Ubuntu 8.04最近字体配置的变化造成的Flash中文乱码的修复

将/etc/fonts/conf.d/49-sansserif.conf删除即可


11.
打开超级用户权限的运行程序对话框

在终端窗口中输入gksu命令,则会弹出一个类似的对话框,但是运行的程序都是在root级权限。你可以通过System->Preferences-> Keyboard Shortcuts,,将这个命令与键盘快捷键(如Shift+Alt+F2)绑定.

12.Ubuntu字体设置

在新的9.04中这个就不用设置了.直接都在系统->首选项->外观->字体全都选择WenQuanYi Bitmap Song就行了

13.超级好用的ftp软件,win下也有哦.Filezilla就是他,没错.你一定会喜欢的

1
sudo apt-get install filezilla filezilla-locales

14.Ubuntu中SSH客户端慢的解决方法

把/etc/ssh/ssh_config里面的GSSAPIAuthentication修改成no就ok了。

1
GSSAPIAuthentication no

15.Ubuntu下ntfs写进fstab中的写法

1
/dev/sda5    /media/wind   ntfs rw,nosuid,nodev    0 0

16.so文件少了的查找方法

1
2
sudo apt-get install apt-file
sudo apt-file search libGL.so.1 #例子

17.ppa的key的添加方法

W: GPG签名验证错误: http://ppa.launchpad.net karmic Release: 由于没有公钥,下列签名无法进行验证: NO_PUBKEY 27F5B2C1B3EAC8D9
添加公匙:

1
sudo apt-key adv --recv-keys --keyserver keyserver.ubuntu.com 27F5B2C1B3EAC8D9

18.有时按方向键的输出,分别为ABCD,解决的方法是

1
echo "set nocompatible" >> ~/.vimrc

在重起就行了

19.Ubuntu输入用户名后.登陆桌面,加载非常慢

用 gconf-editor 在 /desktop/gnome/applications/window_manager/
把 current 和 default 的值由 /usr/bin/compiz 改为 /usr/bin/metacity

这主要是因为装了 compiz-fusion 后出现的 开3D桌面可以装 fusion-icon 或者alt-f2输入 compiz –replace

20.使用preload来记录加载常用的程序,这样可以极大的提高程序启动速度

1
sudo apt-get install preload

21.重装xp后,ubuntu恢复grub的方法
方法1.使用live cd进入系统

1
2
3
4
5
6
7
sudo grub
find /boot/grub/stage1    #实际操作的结果会显示如:(hd0,4)之类的显示
root (hd0,x)     #输入上面find命令反馈的数据,比如像我,就输入4,这个是/boot所在分区
#(注:如果您没有/boot分区,那么这里就填写您的/分区。)
#(注:linux分区编号从1开始,grub分区编号从0开始。)
setup (hd0) #把grub写到MBR上
quit #退出grub

方法2.使用wubi来修复grub

修改windows所在盘的根目录下的『boot.ini』加上如下代码:

1
c:wubildr.mbr="Ubuntu"

然后拷贝本文附件中的wubildr,wubildr.mbr两个文件到c盘根目录,重新启动电脑就好。

23.在Ubuntu(Linux)中好用的思维导图的软件FreeMind

FreeMind 下载地址:http://freemind.sourceforge.net/wiki/index.php/Download

24.Ubuntu(Linux)中好用的项目管理软件OpenProj

OpenProj是一个能够替代MSProject的桌面项目管理工具。它拥有与MS Project同等的功能,一个友好的用户界面并且能够打开现有的MSProject文件。更加重要的就是,他是linux和windows通用的.

OpenProj 下载地址:http://sourceforge.net/projects/openproj/files/

================================================

Ubuntu常用命令

1
2
3
4
5
6
7
8
9
10
11
sudo aptitude update && sudo aptitude safe-upgrade 一键升级系统
sudo apt-get autoremove 自动卸载不需要的软件包
sudo apt-get autoclean 清理旧版本的软件缓存
sudo apt-get clean 清理所有apt下载的软件缓存
apt-cache search name 搜索包含&ldquo;name&rdquo;软件包
dpkg -l |grep ^rc|awk '{print $2}' |tr ["
"] [" "]|
sudo xargs dpkg -P -  清除所有删除包的残余配置文件
lspci 显示系统PCI总线信息
sudo lshw 显示系统详细硬件信息
cat /proc/cpuinfo 显示CPU信息
uname -a 查看内核版本

更改分区卷标,分别是ext和xfsd:

1
2
sudo e2label /dev/hda5 E_Download
sudo xfs_admin -L E_Backup /dev/hda12

以下仅适合IDE硬盘操作,sata硬盘勿试

1
2
3
sudo hdparm -c 1 -d 1 /dev/hda 设置硬盘到 I/O 32位,开启DMA。
sudo hdparm -k 1 /dev/hda 保存更改
sudo hdparm -cdtT /dev/hda 测试IDE硬盘的读写速度

进程

1
2
3
4
5
xkill 图形方式中止一个程序(出现骷髅标志的鼠标,点击需要中止的程序即可)
lsof -p 查看进程打开的文件
nautilus的地址栏里输入
fonts:/// 可以查看本机所有的fonts
fc-cache -f 安装字体后刷新字体缓存(加上 -v 参数可以刷新所有字体缓存)

在ubuntu右键创建“以管理员权限打开夹”

1
sudo apt-get install nautilus-gksu

ksnapshot不错的图型软件

1
sudo apt-get install ksnapshot

wine自动清理菜单项的能力,手工执行

1
wine winemenubuilder -r

我的vim的设置

colorscheme delek

重装win7后修复ubuntu9.10的方法

(1

sudo apt-get install grub-pc

回答下面二个问题

Chainload from menu.lst? <– Yes
Linux command line: <– ENTER

然后重起

sudo reboot

(2

sudo -i
mount /dev/sda7 /mnt
mount /dev/sda6 /mnt/boot
grub-install --root-directory=/mnt/ /dev/sda
mount --bind /proc /mnt/proc
mount --bind /dev /mnt/dev
mount --bind /sys /mnt/sys
chroot /mnt update-grub
umount /mnt/sys
umount /mnt/dev
umount /mnt/proc
exit

原文链接:http://www.php-oa.com/2009/05/03/ubunt.html

Ubuntu 10.04 教育网源

Posted by 冰河 at 22:38 1 Response » 10,776 Views
102010

编辑Ubuntu源的方法:
#sudo gedit /etc/apt/sources.list
将文件里的内容全部删除,记得用sudo cp /etc/apt/sources.list /etc/apt/sources.list.bak命令的方式进行备份,以备不时之需。然后将下列的内容粘贴进gedit后保存即可。

成都电子科大的源,教育网推荐
deb http://Ubuntu.uestc.edu.cn/ubuntu/ lucid main restricted universe multiverse
deb http://Ubuntu.uestc.edu.cn/ubuntu/ lucid-backports main restricted universe multiverse
deb http://Ubuntu.uestc.edu.cn/ubuntu/ lucid-proposed main restricted universe multiverse
deb http://Ubuntu.uestc.edu.cn/ubuntu/ lucid-security main restricted universe multiverse
deb http://Ubuntu.uestc.edu.cn/ubuntu/ lucid-updates main restricted universe multiverse
deb-src http://Ubuntu.uestc.edu.cn/ubuntu/ lucid main restricted universe multiverse
deb-src http://Ubuntu.uestc.edu.cn/ubuntu/ lucid-backports main restricted universe multiverse
deb-src http://Ubuntu.uestc.edu.cn/ubuntu/ lucid-proposed main restricted universe multiverse
deb-src http://Ubuntu.uestc.edu.cn/ubuntu/ lucid-security main restricted universe multiverse
deb-src http://Ubuntu.uestc.edu.cn/ubuntu/ lucid-updates main restricted universe multiverse

中科大的源,教育网推荐
deb http://debian.ustc.edu.cn/Ubuntu/ lucid main restricted universe multiverse
deb http://debian.ustc.edu.cn/Ubuntu/ lucid-backports restricted universe multiverse
deb http://debian.ustc.edu.cn/Ubuntu/ lucid-proposed main restricted universe multiverse
deb http://debian.ustc.edu.cn/Ubuntu/ lucid-security main restricted universe multiverse
deb http://debian.ustc.edu.cn/Ubuntu/ lucid-updates main restricted universe multiverse
deb-src http://debian.ustc.edu.cn/Ubuntu/ lucid main restricted universe multiverse
deb-src http://debian.ustc.edu.cn/Ubuntu/ lucid-backports main restricted universe multiverse
deb-src http://debian.ustc.edu.cn/Ubuntu/ lucid-proposed main restricted universe multiverse
deb-src http://debian.ustc.edu.cn/Ubuntu/ lucid-security main restricted universe multiverse
deb-src http://debian.ustc.edu.cn/Ubuntu/ lucid-updates main restricted universe multiverse

北京交大的源,教育网
deb http://mirror.bjtu.edu.cn/Ubuntu/ lucid main multiverse restricted universe
deb http://mirror.bjtu.edu.cn/Ubuntu/ lucid-backports main multiverse restricted universe
deb http://mirror.bjtu.edu.cn/Ubuntu/ lucid-proposed main multiverse restricted universe
deb http://mirror.bjtu.edu.cn/Ubuntu/ lucid-security main multiverse restricted universe
deb http://mirror.bjtu.edu.cn/Ubuntu/ lucid-updates main multiverse restricted universe
deb-src http://mirror.bjtu.edu.cn/Ubuntu/ lucid main multiverse restricted universe
deb-src http://mirror.bjtu.edu.cn/Ubuntu/ lucid-backports main multiverse restricted universe
deb-src http://mirror.bjtu.edu.cn/Ubuntu/ lucid-proposed main multiverse restricted universe
deb-src http://mirror.bjtu.edu.cn/Ubuntu/ lucid-security main multiverse restricted universe
deb-src http://mirror.bjtu.edu.cn/Ubuntu/ lucid-updates main multiverse restricted universe

兰州大学的源,教育网
deb ftp://mirror.lzu.edu.cn/Ubuntu/ lucid main multiverse restricted universe
deb ftp://mirror.lzu.edu.cn/Ubuntu/ lucid-backports main multiverse restricted universe
deb ftp://mirror.lzu.edu.cn/Ubuntu/ lucid-proposed main multiverse restricted universe
deb ftp://mirror.lzu.edu.cn/Ubuntu/ lucid-security main multiverse restricted universe
deb ftp://mirror.lzu.edu.cn/Ubuntu/ lucid-updates main multiverse restricted universe
deb ftp://mirror.lzu.edu.cn/Ubuntu-cn/ lucid main multiverse restricted universe

上海交大的源
deb http://ftp.sjtu.edu.cn/Ubuntu/ lucid main multiverse restricted universe
deb http://ftp.sjtu.edu.cn/Ubuntu/ lucid-backports main multiverse restricted universe
deb http://ftp.sjtu.edu.cn/Ubuntu/ lucid-proposed main multiverse restricted universe
deb http://ftp.sjtu.edu.cn/Ubuntu/ lucid-security main multiverse restricted universe
deb http://ftp.sjtu.edu.cn/Ubuntu/ lucid-updates main multiverse restricted universe
deb http://ftp.sjtu.edu.cn/Ubuntu-cn/ lucid main multiverse restricted universe
deb-src http://ftp.sjtu.edu.cn/Ubuntu/ lucid main multiverse restricted universe
deb-src http://ftp.sjtu.edu.cn/Ubuntu/ lucid-backports main multiverse restricted universe
deb-src http://ftp.sjtu.edu.cn/Ubuntu/ lucid-proposed main multiverse restricted universe
deb-src http://ftp.sjtu.edu.cn/Ubuntu/ lucid-security main multiverse restricted universe
deb-src http://ftp.sjtu.edu.cn/Ubuntu/ lucid-updates main multiverse restricted universe

163的源,电信教育网通用
deb http://mirrors.163.com/Ubuntu/ lucid main restricted universe multiverse
deb http://mirrors.163.com/Ubuntu/ lucid-security main restricted universe multiverse
deb http://mirrors.163.com/Ubuntu/ lucid-updates main restricted universe multiverse
deb http://mirrors.163.com/Ubuntu/ lucid-proposed main restricted universe multiverse
deb http://mirrors.163.com/Ubuntu/ lucid-backports main restricted universe multiverse
deb-src http://mirrors.163.com/Ubuntu/ lucid main restricted universe multiverse
deb-src http://mirrors.163.com/Ubuntu/ lucid-security main restricted universe multiverse
deb-src http://mirrors.163.com/Ubuntu/ lucid-updates main restricted universe multiverse
deb-src http://mirrors.163.com/Ubuntu/ lucid-proposed main restricted universe multiverse
deb-src http://mirrors.163.com/Ubuntu/ lucid-backports main restricted universe multiverse

搜狐的源,电信教育网通用
deb http://mirrors.sohu.com/ubuntu/ lucid main restricted
deb-src http://mirrors.sohu.com/ubuntu/ lucid main restricted
deb http://mirrors.sohu.com/ubuntu/ lucid-updates main restricted
deb-src http://mirrors.sohu.com/ubuntu/ lucid-updates main restricted
deb http://mirrors.sohu.com/ubuntu/ lucid universe
deb-src http://mirrors.sohu.com/ubuntu/ lucid universe
deb http://mirrors.sohu.com/ubuntu/ lucid-updates universe
deb-src http://mirrors.sohu.com/ubuntu/ lucid-updates universe
deb http://mirrors.sohu.com/ubuntu/ lucid multiverse
deb-src http://mirrors.sohu.com/ubuntu/ lucid multiverse
deb http://mirrors.sohu.com/ubuntu/ lucid-updates multiverse
deb-src http://mirrors.sohu.com/ubuntu/ lucid-updates multiverse

保存后输入下面的指令刷新源信息:
#sudo apt-get update
然后输入:
#sudo apt-get upgrade
就可以进行系统升级了。

原文链接:http://www.ubuntuhome.com/ubuntu-10-04-yuan.html

142010

1、 基本概念(这是理解后面的知识的前提,请务必理解)

a、 I/O重定向通常与 FD有关,shell的FD通常为10个,即 0~9;

b、 常用FD有3个,为0(stdin,标准输入)、1(stdout,标准输出)、2(stderr,标准错误输出),默认与keyboard、monitor、monitor有关;

c、 用 < 来改变读进的数据信道(stdin),使之从指定的档案读进;

d、 用 > 来改变送出的数据信道(stdout, stderr),使之输出到指定的档案;

e、 0 是 < 的默认值,因此 < 与 0<是一样的;同理,> 与 1> 是一样的;

f、 在IO重定向 中,stdout 与 stderr 的管道会先准备好,才会从 stdin 读进资料;

g、 管道“|”(pipe line):上一个命令的 stdout 接到下一个命令的 stdin;

h、 tee 命令是在不影响原本 I/O 的情况下,将 stdout 复制一份到档案去;

i、 bash(ksh)执行命令的过程:分析命令-变量求值-命令替代(“和$( ))-重定向-通配符展开-确定路径-执行命令;

j、 ( ) 将 command group 置于 sub-shell 去执行,也称 nested sub-shell,它有一点非常重要的特性是:继承父shell的Standard input, output, and error plus any other open file descriptors。

k、 exec 命令:常用来替代当前 shell 并重新启动一个 shell,换句话说,并没有启动子 shell。使用这一命令时任何现有环境都将会被清除。exec 在对文件描述符进行操作的时候,也只有在这时,exec 不会覆盖你当前的 shell 环境。

2、 基本IO

cmd > file 把 stdout 重定向到 file 文件中;

cmd >> file 把 stdout 重定向到 file 文件中(追加);

cmd 1> fiel 把 stdout 重定向到 file 文件中;

cmd > file 2>&1 把 stdout 和 stderr 一起重定向到 file 文件中;

cmd 2> file 把 stderr 重定向到 file 文件中;

cmd 2>> file 把 stderr 重定向到 file 文件中(追加);

cmd >> file 2>&1 把 stderr 和 stderr 一起重定向到 file 文件中(追加);

cmd < file >file2 cmd 命令以 file 文件作为 stdin,以 file2 文件作为 stdout;

cat <>file 以读写的方式打开 file;

cmd < file cmd 命令以 file 文件作为 stdin;

cmd << delimiter Here document,从 stdin 中读入,直至遇到 delimiter 分界符。

3、 进阶IO

>&n 使用系统调用 dup (2) 复制文件描述符 n 并把结果用作标准输出;

<&n 标准输入复制自文件描述符 n;

<&- 关闭标准输入(键盘);

>&- 关闭标准输出;

n<&- 表示将 n 号输入关闭;

n>&- 表示将 n 号输出关闭;

上述所有形式都可以前导一个数字,此时建立的文件描述符由这个数字指定而不是缺省的 0 或 1。如:

… 2>file 运行一个命令并把错误输出(文件描述符 2)定向到 file。

… 2>&1 运行一个命令并把它的标准输出和输出合并。(严格的说是通过复制文件描述符 1 来建立文件描述符 2 ,但效果通常是合并了两个流。)

我 们对 2>&1详细说明一下 :2>&1 也就是 FD2=FD1 ,这里并不是说FD2 的值 等于FD1的值,因为 > 是改变送出的数据信道,也就是说把 FD2 的 “数据输出通道” 改为 FD1 的 “数据输出通道”。如果仅仅这样,这个改变好像没有什么作用,因为 FD2 的默认输出和 FD1的默认输出本来都是 monitor,一样的! 但是,当 FD1 是其他文件,甚至是其他 FD 时,这个就具有特殊的用途了。请大家务必理解这一点。

exec 0exec 1>outfilename # 打开文件outfilename作为stdout。

exec 2>errfilename # 打开文件 errfilename作为 stderr。

exec 0<&- # 关闭 FD0。

exec 1>&- # 关闭 FD1。

exec 5>&- # 关闭 FD5。

问: 如果关闭了 FD0、FD1、FD2,其后果是什么? 恢复 FD0、FD1、FD2与 关闭FD0、FD1、FD2 有什么区别?代码分别是什么? 打开了FD3~FD9,我们用完之后,你觉得是将他们关闭还是恢复?

下面是提示(例子来源于CU一帖子,忘记出处,来日再补上):


exec 6>&2 2>ver
command >>dev/null &
exec 2>&6 # 恢复 FD2

4、 简单举例

a、stdout和stderr都通过管道送给egrep了:


(ls you no 2>&1;ls yes 2>&1) 2>&1|egrep * >file
(ls you no 2>&1;ls yes 2>&1)|egrep * >file
(ls you no;ls yes) 2>&1|egrep * >file

这个例子要注意的就是:

理 解 命令执行顺序 和 管道“|”:在命令执行前,先要进行重定向的处理,并将把 nested sub-shell 的stdout 接到 egrep 命令的 stdin。 nested sub-shell ,在 ( ) 中的两个命令加上(),可以看作一个命令。其 FD1 已经连接到“|”往egrep送了,当遇到 2>&1时,也就是FD2=FD1,即FD2同FD1一样,往管道 “|”那边送。

b、 没有任何东西通过管道送给egrep,全部送往monitor。 (ls you no 2>&1;ls yes 2>&1) >&2|egrep * >file。虽然在()里面将 FD2转往FD1,但在()外,遇到 >&2 ,结果所有的都送到monitor。 请理解:


(ls you no 2>&1) 1>&2|egrep * >file ## 送到 monitor
ls you no 2>&1 1>&2|egrep * >file ## 送给 管道 “|”
ls you no 1>&2 2>&1|egrep * >file ## 送到 monitor


5、 中阶例子

条件: stderr通过管道送给egrep,正确消息仍然送给monitor(不变)


exec 4>&1;(ls you no 2>&1 1>&4 4>&-;ls yes 2>&1 1>
&4 4>&-)|egrep * >file;exec 4>&-
或者
exec 4>&1;(ls you no;ls yes) 2>&1 1>
&4 4>&-|egrep * >file;exec 4>&-

如果加两个条件:

(1)要求cmd1和cmd2并行运行;

(2)将cmd1的返回值赋给变量 ss。

则为:


exec 3>&1;exec 4>&1
ss=$(((ls you no 2>&1 1>&3 3>&-;echo $? >&4)|egrep * >file) 4>&1)
exec 3>&-;exec 4>&-

说明:

exec 3>&1;4>&1 建立FD3,是用来将下面ls那条语句(子shell)中的FD1 恢复到正常FD1,即输出到monitor,你可以把FD3看作最初始的FD1的硬盘备份(即输出到monitor);建立FD4,到时用作保存ls的返 回值(echo $?),你可以将FD4看作你考试时用于存放计算“echo $?”的草稿纸;

(ls you no 2>&1 1>&3 3>&-;echo $? >&4) 大家还记得前面说的子shell和管道吧。这条命令首先会继承FD0、FD1、FD2、FD3、FD4,它位于管道前,所以在运行命令前会先把子 shell自己的FD1和管道“|”相连。但是我们的条件是stderr通过管道送往egrep,stdout仍然输出到monitor。 于是通过2>&1,先把 子shell的FD1 的管道“送给”FD2,于是子shell中的stderr送往管道“|”;再通过 1>&3,把以前的“硬盘备份”恢复给子shell的FD1,于是子shell中的FD1变成送到monitor了。再通过3> &- ,将3关闭;接着运行echo $? ,本来其输出值应该送往管道的,通过 >&4 ,将 输出 送往 “草稿纸”FD4,留以备用。

((ls you no 2>&1 1>&3 3>&-;echo $? >&4)|egrep * >file) 于是,stderr 通过管道送给 egrep ,stdout 送给monitor,但是,还有 FD4,它送到哪去了? $(((ls you no 2>&1 1>&3 3>&-;echo $? >&4)|egrep * >file) 4>&1)最后的 4>&1 ,就是把FD4 重定向到 FD1。但由于其输出在 $( )中,其值就赋给变量ss了。最后一行关闭 FD3、FD4。

6、 高阶例子

命令 cmd1, cmd2, cmd3, cmd4. 如何利用单向管道完成下列功能:

1. 所有命令并行执行。

2. cmd1 和 cmd2 不需要 stdin。

3. cmd1 和 cmd2 的 stdout 定向到 cmd3 的 stdin。

4. cmd1 和 cmd2 的 stderr 定向到 cmd4 的 stdin。

5. cmd3 的 stdout 定向到文件 a, stderr 定向到屏幕。

6. cmd4 的 stdout 定向到文件 b, stderr 定向到屏幕。

7. cmd1 的返回码赋给变量 s。

8. 不能利用临时文件。

解决方法:


exec 3>&1; exec 4>&1
s=$(((((cmd1 1>&3 ; echo $? >&4 )| cmd2 ) 3>
&1 | cmd3 >a 2>&3 ) 2>&1 | cmd4 >b ) 4>&1)
exec 3>&-; exec 4>&-

这 个我一步步解释(好复杂,自己感觉看明白了,过一会再看,大脑仍然有几分钟空白~~~,没想到我也能看明白。exec 3>&1; exec 4>&1 前面的例子都有说明了,就是建立FD3 ,给cmd1恢复其FD1用和给cmd3 恢复其FD2用,建立FD4,保存“echo $?”输出值的“草稿纸”。

第 一对括号:(cmd1 1>&3 ; echo $? >&4 ) 和其后(第一个)管道。在第一个括号(子shell)中,其FD1已经连到 管道中了,所以用 FD3 将 FD1恢复正常,不让他往管道跑;这里的cmd1没有stdin,接着将 cmd1 运行的返回码 保存到 FD4 中。

第 二对括号:((cmd1 1>&3 ; echo $? >&4 )| cmd2 ) 3>&1 和其后(第二个)管道。前面的 FD1 已经不送给 cmd2了,FD2 默认也不送过来,所以cmd2 也没有stdin ,所以在第二对括号里面:cmd1和cmd2 的stdout、stderr 为默认输出,一直遇到 “3>&1”为止。请注意:“3>&1”,先将第二对括号看出一个命令,他们遇到 第二个管道时,其FD1 连到 管道 “|”,由于“3>&1”的作用,子shell的FD1 送给FD3 使用,所以所有FD3 的输出都 “流往”cmd3,又由于继承关系(继承第一行的命令),FD3实际上就是cmd1和cmd2的stdout,于是“ cmd1 和 cmd2 的 stdout 定向到 cmd3 的 stdin”

第 三对括号:(((cmd1 1>&3 ; echo $? >&4 )| cmd2 ) 3>&1 | cmd3 >a 2>&3 ) 2>&1 和其后的第三个管道。cmd1 和 cmd2 的 stdout 已经定向到 cmd3 的 stdin,处理之后,cmd3 >a 意味着将其 stdout 送给 a 文件。而2>&3的意思是:恢复cmd3的错误输出为FD3,即送往 monitor。于是“cmd3 的 stdout 定向到文件 a, stderr 定向到屏幕”。如果没有“2>&3”,那么cmd3的错误输出就会干扰cmd1和cmd2的错误输出,所以它是必须的!请注意第三对括号后 的 “2>&1”| ,其子shell的FD1 本来连接着管道“|”,但子shell FD1 慷慨大方,送给了 FD2,于是FD2 连接着管道。还记得前面的 cmd1 和 cmd2 吗?他们的stderr一直没动了。于是在这里,通过管道送给了 第四个命令cmd4 了。即“cmd1 和 cmd2 的 stderr 定向到 cmd4 的 stdin”。后面就比较简单了。cmd4 >b 表示“cmd4 的 stdout 定向到文件 b, stderr 定向到屏幕(默认)”

第 四对括号:((((cmd1 1>&3 ; echo $? >&4 )| cmd2 ) 3>&1 | cmd3 >a 2>&3 ) 2>&1 | cmd4 >b ) 与其后的 4>&1。四对括号里面的 FD1、FD2都处理完了。但是还记得前面“echo $? >&4”那块“草稿纸”吗?“4>&1”的作用就是“将草稿纸上的内容送给monitor”,但是由于最外面还有 $() 将其“包着”。于是其值赋给变量“s”。

092010

Linux默认启动后进入XWindow,但可以修改参数直接进入命令行界面。到底是进入XWindow还是进入命令行界面,是在系统初始化进行的。

对于大部分linux系统,初始化使用init进程, /etc/inittab 为其配置文件。例如

# The default runlevel
id:2:initdefault

# Boot-time system configuration/initialization script
si::sysinit:/etc/init.d/rcS

# Runlevels
l0:0:wait:/etc/init.d/rc 0
l1:1:wait:/etc/init.d/rc 1
l2:2:wait:/etc/init.d/rc 2
l3:3:wait:/etc/init.d/rc 3
l4:4:wait:/etc/init.d/rc 4
l5:5:wait:/etc/init.d/rc 5
l6:6:wait:/etc/init.d/rc 6
z6:6:respawn:/sbin/sulogin

# How to react to ctrl-alt-del
ca:12345:ctrlaltdel:/sbin/shutdown -t1 -a -r now

这些内容的通用格式为 id:runlevels:action:process。id 是惟一标识该项的字符序列。runlevels 定义了操作所使用的运行级别。action 指定了要执行的特定操作。process 定义了要执行的进程。

# 对各个运行级的详细解释:
0 为停机,机器关闭。
1 为单用户模式,就像Win9x下的安全模式类似。
2 为多用户模式,但是没有NFS支持。
3 为完整的多用户模式,是标准的运行级。
4 一般不用,在一些特殊情况下可以用它来做一些事情。例如在笔记本电脑的电池用尽时,可以切换到这个模式来做一些设置。
5 就是X11,进到X Window系统了。
6 为重启,运行init 6机器就会重启。

XWindow是init5,字符是init3。将id设置为runlevel设置为3,就可以直接在系统初始化的时候直接进入文本界面。

但Ubuntu并没有采用init的方法,并没有 /etc/inittab这个文件。init使用的是串行的方式,引导很耗时。RedHat9启动时串行执行大量的脚本以启动各种需要的服务(启动时可以 看到)。Ubuntu采用了upstart,是一个基于事件的 init 的替代程序,用于 Ubuntu 发行版。

Ubuntu中没有 /etc/inittab这个文件,但用户可以自己添加。当系统中有 /etc/inittab 时Ubuntu会按照配置来启动。

所以要想直接进命令行,第一种方法是用户添加 /etc/inittab,不过Debian或是Ubuntu中默认run level是2,且2~5都是指X环境。(但命令行是几?不确定,尚未测试)

另外一种方法,可以考虑在对应的runlevel级别停止gdm服务:

$ sudo mv /etc/rc2.d/S30gdm /etc/rc2.d/K30gdm (有可能是S13gdm,不一定)
还可以把gdm删掉。先备份/etc/init.d/gdm到其它位置:

$ sudo /etc/init.d/gdm /usr/gdm

然后删除/etc/init.d/gdm,删除后只是不启动XWindow,其它服务不变。需要直接进入XWindow到话,再复制回来。

其实如果仅仅是为了在命令行下的话,在xwindows界面下按Ctrl + Alt + F2 进入字符界面,按Ctrl + Alt + F7 回到图形界面。

还有一种方法:

$sudo apt-get rcconf

$sudo rcconf

在启动中将gdm去掉

/etc/passwd & /etc/shadow 详解

Posted by 冰河 at 21:50 No Responses » 10,241 Views
十二 182009

1,passwd文件
passwd文件存放在/etc目录下。这个文件存放着所有用户帐号的信息,包括用户名和密码,因此,它对系统来说是至关重要的。可以使用如下命令查看该文件:cat /etc/passwd
Passwd文件由许多条记录组成,每条记录占一行,记录了一个用户帐号的所有信息。每条记录由7个字段组成,字段间用冒号“:”隔开,其格式如下:
username:password:User ID:Group ID:comment:home directory:shell
字段含义:
username 用户名
它唯一地标识了一个用户帐号,用户在登录时使用的就是它。
password 该帐号的口令。passwd文件中存放的密码是经过加密处理的。Linux的加密算法很严密,其中的口令几乎是不可能被破解的。盗用帐号的人一般都借助专门的黑客程序,构造出无数个密码,然后使用同样的加密算法将其加密,再和本字段进行比较,如果相同的话,就代表构造出的口令是正确的。因此,建议不要使用生日、常用单词等作为口令,它们在黑客程序面前几乎是不堪一击的。特别是对那些直接连入较大网络的系统来说,系统安全性显得尤为重要。
User ID 用户识别码,简称UID。Linux系统内部使用UID来标识用户,而不是用户名。UID是一个整数,用户的UID互不相同。
Group ID 用户组识别码,简称GID。不同的用户可以属于同一个用户组,享有该用户组共有的权限。与UID类似,GID唯一地标识了一个用户组。
comment 这是给用户帐号做的注解。它一般是用户真实姓名、电话号码、住址等,当然也可以是空的。
home directory 主目录。这个目录属于该帐号,当用户登录后,它就会被置于此目录中,就像回到家一样。一般来说,root帐号的主目录是/root,其他帐号的家目录都在/home目录下,并且和用户名同名。
login command 用户登录后执行的命令。一般来说,这个命令将启动一个shell程序。例如,用bbs帐号登录后,会直接进入bbs系统,这是因为bbs帐号的login command指向的是bbs程序,等系统登录到bbs时就自动运行这些命令。
系统帐号:系统中还有一些默认的帐号,如daemon、bin等。这些帐号有着特殊的用途,一般用于进行系统管理。这些帐号的口令大部分用(x)号表示,代表它们不能在登录时使用。
2,shadow文件
为了增强系统的安全性,Linux系统还可以为用户提供MD5和Shadow安全密码服务。如果在安装 Linux 时在相关配置的选项上选中了MD5和Shadow服务,那么将看到的/etc/passwd文件里的passwd项上无论是什么用户,都是一个“x”,这就表示这些用户都登录不了;系统其实是把真正的密码数据放在了/etc/shadow文件里。
/etc/shadow文件只能以root身份来浏览。为什么要这样做呢,原因其实很简单,在系统设计的时候,/etc/passwd文件是任何人都可以读的,那么那些心有所图的人就可以利用这个文件,使用各种各样的工具按照Linux密码加密的方法把用户甚至root的密码试出来,这样整个系统就会被他所控制,严重危害系统的安全和用户数据的保密性。
3,有关命令
pwconv
根据/etc/passwd文件生成/etc/shadow。它把所有口令从/etc/passwd移到/etc/shadow中。
pwunconv
将/etc/shadow中的信息尽可能地恢复到/etc/passwd。

Ubuntu 8.04 源列表

Posted by 冰河 at 21:48 No Responses » 5,769 Views
十二 182009

Hardy(8.04) 版本
Archive.ubuntu.com更新服务器(欧洲,此为官方源,电信网通用户使用):

deb http://archive.ubuntu.com/ubuntu/ hardy main restricted universe multiverse
deb http://archive.ubuntu.com/ubuntu/ hardy-security main restricted universe multiverse
deb http://archive.ubuntu.com/ubuntu/ hardy-updates main restricted universe multiverse
deb http://archive.ubuntu.com/ubuntu/ hardy-proposed main restricted universe multiverse
deb http://archive.ubuntu.com/ubuntu/ hardy-backports main restricted universe multiverse
deb-src http://archive.ubuntu.com/ubuntu/ hardy main restricted universe multiverse
deb-src http://archive.ubuntu.com/ubuntu/ hardy-security main restricted universe multiverse
deb-src http://archive.ubuntu.com/ubuntu/ hardy-updates main restricted universe multiverse
deb-src http://archive.ubuntu.com/ubuntu/ hardy-proposed main restricted universe multiverse
deb-src http://archive.ubuntu.com/ubuntu/ hardy-backports main restricted universe multiverse
Ubuntu.cn99.com更新服务器(江苏省常州市电信,推荐电信用户使用):

deb http://ubuntu.cn99.com/ubuntu/ hardy main restricted universe multiverse
deb http://ubuntu.cn99.com/ubuntu/ hardy-security main restricted universe multiverse
deb http://ubuntu.cn99.com/ubuntu/ hardy-updates main restricted universe multiverse
deb http://ubuntu.cn99.com/ubuntu/ hardy-proposed main restricted universe multiverse
deb http://ubuntu.cn99.com/ubuntu/ hardy-backports main restricted universe multiverse
deb-src http://ubuntu.cn99.com/ubuntu/ hardy main restricted universe multiverse
deb-src http://ubuntu.cn99.com/ubuntu/ hardy-security main restricted universe multiverse
deb-src http://ubuntu.cn99.com/ubuntu/ hardy-updates main restricted universe multiverse
deb-src http://ubuntu.cn99.com/ubuntu/ hardy-proposed main restricted universe multiverse
deb-src http://ubuntu.cn99.com/ubuntu/ hardy-backports main restricted universe multiverse
deb http://ubuntu.cn99.com/ubuntu-cn/ hardy main restricted universe multiverse
Mirrors.shlug.org更新服务器(电信服务器,Ubuntu China Official Mirror, maintained by Shanghai Linux User Group):

deb http://cn.archive.ubuntu.com/ubuntu hardy main restricted universe multiverse
deb http://cn.archive.ubuntu.com/ubuntu hardy-security main restricted universe multiverse
deb http://cn.archive.ubuntu.com/ubuntu hardy-updates main restricted universe multiverse
deb http://cn.archive.ubuntu.com/ubuntu hardy-backports main restricted universe multiverse
deb http://cn.archive.ubuntu.com/ubuntu hardy-proposed main restricted universe multiverse
deb-src http://cn.archive.ubuntu.com/ubuntu hardy main restricted universe multiverse
deb-src http://cn.archive.ubuntu.com/ubuntu hardy-security main restricted universe multiverse
deb-src http://cn.archive.ubuntu.com/ubuntu hardy-updates main restricted universe multiverse
deb-src http://cn.archive.ubuntu.com/ubuntu hardy-backports main restricted universe multiverse
deb-src http://cn.archive.ubuntu.com/ubuntu hardy-proposed main restricted universe multiverse

Mirror.lupaworld.com更新服务器(浙江省杭州市双线服务器):

deb http://mirror.lupaworld.com/ubuntu hardy main restricted universe multiverse
deb http://mirror.lupaworld.com/ubuntu hardy-security main restricted universe multiverse
deb http://mirror.lupaworld.com/ubuntu hardy-updates main restricted universe multiverse
deb http://mirror.lupaworld.com/ubuntu hardy-backports main restricted universe multiverse
deb http://mirror.lupaworld.com/ubuntu hardy-proposed main restricted universe multiverse
deb-src http://mirror.lupaworld.com/ubuntu hardy main restricted universe multiverse
deb-src http://mirror.lupaworld.com/ubuntu hardy-security main restricted universe multiverse
deb-src http://mirror.lupaworld.com/ubuntu hardy-updates main restricted universe multiverse
deb-src http://mirror.lupaworld.com/ubuntu hardy-backports main restricted universe multiverse
deb-src http://mirror.lupaworld.com/ubuntu hardy-proposed main restricted universe multiverse

厦门大学更新服务器(教育网服务器):

deb ftp://ubuntu.realss.cn/ubuntu/ hardy main restricted universe multiverse
deb ftp://ubuntu.realss.cn/ubuntu/ hardy-backports restricted universe multiverse
deb ftp://ubuntu.realss.cn/ubuntu/ hardy-proposed main restricted universe multiverse
deb ftp://ubuntu.realss.cn/ubuntu/ hardy-security main restricted universe multiverse
deb ftp://ubuntu.realss.cn/ubuntu/ hardy-updates main restricted universe multiverse
deb-src ftp://ubuntu.realss.cn/ubuntu/ hardy main restricted universe multiverse
deb-src ftp://ubuntu.realss.cn/ubuntu/ hardy-backports main restricted universe multiverse
deb-src ftp://ubuntu.realss.cn/ubuntu/ hardy-proposed main restricted universe multiverse
deb-src ftp://ubuntu.realss.cn/ubuntu/ hardy-security main restricted universe multiverse
deb-src ftp://ubuntu.realss.cn/ubuntu/ hardy-updates main restricted universe multiverse

成都市 电子科技大学更新服务器(教育网,推荐校园网和网通用户使用):

deb http://ubuntu.uestc.edu.cn/ubuntu/ hardy main multiverse restricted universe
deb http://ubuntu.uestc.edu.cn/ubuntu/ hardy-backports main multiverse restricted universe
deb http://ubuntu.uestc.edu.cn/ubuntu/ hardy-proposed main multiverse restricted universe
deb http://ubuntu.uestc.edu.cn/ubuntu/ hardy-security main multiverse restricted universe
deb http://ubuntu.uestc.edu.cn/ubuntu/ hardy-updates main multiverse restricted universe
deb-src http://ubuntu.uestc.edu.cn/ubuntu/ hardy main multiverse restricted universe
deb-src http://ubuntu.uestc.edu.cn/ubuntu/ hardy-backports main multiverse restricted universe
deb-src http://ubuntu.uestc.edu.cn/ubuntu/ hardy-proposed main multiverse restricted universe
deb-src http://ubuntu.uestc.edu.cn/ubuntu/ hardy-security main multiverse restricted universe
deb-src http://ubuntu.uestc.edu.cn/ubuntu/ hardy-updates main multiverse restricted universe

== 如果无法解析uestc.edu.cn域名,请使用以下地址 ==

deb http://ubuntu.dormforce.net/ubuntu/ hardy main multiverse restricted universe
deb http://ubuntu.dormforce.net/ubuntu/ hardy-backports main multiverse restricted universe
deb http://ubuntu.dormforce.net/ubuntu/ hardy-proposed main multiverse restricted universe
deb http://ubuntu.dormforce.net/ubuntu/ hardy-security main multiverse restricted universe
deb http://ubuntu.dormforce.net/ubuntu/ hardy-updates main multiverse restricted universe
deb-src http://ubuntu.dormforce.net/ubuntu/ hardy main multiverse restricted universe
deb-src http://ubuntu.dormforce.net/ubuntu/ hardy-backports main multiverse restricted universe
deb-src http://ubuntu.dormforce.net/ubuntu/ hardy-proposed main multiverse restricted universe
deb-src http://ubuntu.dormforce.net/ubuntu/ hardy-security main multiverse restricted universe
deb-src http://ubuntu.dormforce.net/ubuntu/ hardy-updates main multiverse restricted universe

上海市上海交通大学更新服务器(教育网,推荐校园网和网通用户使用):

deb http://ftp.sjtu.edu.cn/ubuntu/ hardy main multiverse restricted universe
deb http://ftp.sjtu.edu.cn/ubuntu/ hardy-backports main multiverse restricted universe
deb http://ftp.sjtu.edu.cn/ubuntu/ hardy-proposed main multiverse restricted universe
deb http://ftp.sjtu.edu.cn/ubuntu/ hardy-security main multiverse restricted universe
deb http://ftp.sjtu.edu.cn/ubuntu/ hardy-updates main multiverse restricted universe
deb-src http://ftp.sjtu.edu.cn/ubuntu/ hardy main multiverse restricted universe
deb-src http://ftp.sjtu.edu.cn/ubuntu/ hardy-backports main multiverse restricted universe
deb-src http://ftp.sjtu.edu.cn/ubuntu/ hardy-proposed main multiverse restricted universe
deb-src http://ftp.sjtu.edu.cn/ubuntu/ hardy-security main multiverse restricted universe
deb-src http://ftp.sjtu.edu.cn/ubuntu/ hardy-updates main multiverse restricted universe

中国科学技术大学更新服务器(教育网,推荐校园网和网通用户使用):

deb http://debian.ustc.edu.cn/ubuntu/ hardy main multiverse restricted universe
deb http://debian.ustc.edu.cn/ubuntu/ hardy-backports main multiverse restricted universe
deb http://debian.ustc.edu.cn/ubuntu/ hardy-proposed main multiverse restricted universe
deb http://debian.ustc.edu.cn/ubuntu/ hardy-security main multiverse restricted universe
deb http://debian.ustc.edu.cn/ubuntu/ hardy-updates main multiverse restricted universe
deb-src http://debian.ustc.edu.cn/ubuntu/ hardy main multiverse restricted universe
deb-src http://debian.ustc.edu.cn/ubuntu/ hardy-backports main multiverse restricted universe
deb-src http://debian.ustc.edu.cn/ubuntu/ hardy-proposed main multiverse restricted universe
deb-src http://debian.ustc.edu.cn/ubuntu/ hardy-security main multiverse restricted universe
deb-src http://debian.ustc.edu.cn/ubuntu/ hardy-updates main multiverse restricted universe
北京市清华大学更新服务器(教育网,推荐校园网和网通用户使用):

deb http://mirror9.net9.org/ubuntu/ hardy main multiverse restricted universe
deb http://mirror9.net9.org/ubuntu/ hardy-backports main multiverse restricted universe
deb http://mirror9.net9.org/ubuntu/ hardy-proposed main multiverse restricted universe
deb http://mirror9.net9.org/ubuntu/ hardy-security main multiverse restricted universe
deb http://mirror9.net9.org/ubuntu/ hardy-updates main multiverse restricted universe
deb-src http://mirror9.net9.org/ubuntu/ hardy main multiverse restricted universe
deb-src http://mirror9.net9.org/ubuntu/ hardy-backports main multiverse restricted universe
deb-src http://mirror9.net9.org/ubuntu/ hardy-proposed main multiverse restricted universe
deb-src http://mirror9.net9.org/ubuntu/ hardy-security main multiverse restricted universe
deb-src http://mirror9.net9.org/ubuntu/ hardy-updates main multiverse restricted universe

沈阳市东北大学更新服务器(教育网,推荐校园网和网通用户使用):

deb ftp://ftp.neu.edu.cn/mirror/archive.ubuntu.com/ubuntu/ hardy main multiverse restricted universe
deb ftp://ftp.neu.edu.cn/mirror/archive.ubuntu.com/ubuntu/ hardy-backports main multiverse restricted universe
deb ftp://ftp.neu.edu.cn/mirror/archive.ubuntu.com/ubuntu/ hardy-proposed main multiverse restricted universe
deb ftp://ftp.neu.edu.cn/mirror/archive.ubuntu.com/ubuntu/ hardy-security main multiverse restricted universe
deb ftp://ftp.neu.edu.cn/mirror/archive.ubuntu.com/ubuntu/ hardy-updates main multiverse restricted universe
deb-src ftp://ftp.neu.edu.cn/mirror/archive.ubuntu.com/ubuntu/ hardy main multiverse restricted universe
deb-src ftp://ftp.neu.edu.cn/mirror/archive.ubuntu.com/ubuntu/ hardy-backports main multiverse restricted universe
deb-src ftp://ftp.neu.edu.cn/mirror/archive.ubuntu.com/ubuntu/ hardy-proposed main multiverse restricted universe
deb-src ftp://ftp.neu.edu.cn/mirror/archive.ubuntu.com/ubuntu/ hardy-security main multiverse restricted universe
deb-src ftp://ftp.neu.edu.cn/mirror/archive.ubuntu.com/ubuntu/ hardy-updates main multiverse restricted universe

中国台湾 台湾大学更新服务器(推荐网通用户使用,电信PING平均响应速度41MS。强烈推荐此源,比较完整,较少出现同步问题):

deb http://ubuntu.csie.ntu.edu.tw/ubuntu/ hardy main restricted universe multiverse
deb-src http://ubuntu.csie.ntu.edu.tw/ubuntu/ hardy main restricted universe multiverse
deb http://ubuntu.csie.ntu.edu.tw/ubuntu/ hardy-updates main restricted universe multiverse
deb-src http://ubuntu.csie.ntu.edu.tw/ubuntu/ hardy-updates main restricted universe multiverse
deb http://ubuntu.csie.ntu.edu.tw/ubuntu/ hardy-backports main restricted universe multiverse
deb-src http://ubuntu.csie.ntu.edu.tw/ubuntu/ hardy-backports main restricted universe multiverse
deb http://ubuntu.csie.ntu.edu.tw/ubuntu/ hardy-security main restricted universe multiverse
deb-src http://ubuntu.csie.ntu.edu.tw/ubuntu/ hardy-security main restricted universe multiverse
deb http://ubuntu.csie.ntu.edu.tw/ubuntu/ hardy-proposed main multiverse restricted universe
deb-src http://ubuntu.csie.ntu.edu.tw/ubuntu/ hardy-proposed main restricted universe multiverse

Mirror.vmmatrix.net更新服务器(上海市电信,推荐电信网通用户使用):

deb http://mirror.vmmatrix.net/ubuntu/ hardy main restricted universe multiverse
deb-src http://mirror.vmmatrix.net/ubuntu/ hardy main restricted universe multiverse
deb http://mirror.vmmatrix.net/ubuntu/ hardy-updates main restricted universe multiverse
deb-src http://mirror.vmmatrix.net/ubuntu/ hardy-updates main restricted universe multiverse
deb http://mirror.vmmatrix.net/ubuntu/ hardy-backports main restricted universe multiverse
deb-src http://mirror.vmmatrix.net/ubuntu/ hardy-backports main restricted universe multiverse
deb http://mirror.vmmatrix.net/ubuntu/ hardy-security main restricted universe multiverse
deb-src http://mirror.vmmatrix.net/ubuntu/ hardy-security main restricted universe multiverse
deb http://mirror.vmmatrix.net/ubuntu/ hardy-proposed main multiverse restricted universe
deb-src http://mirror.vmmatrix.net/ubuntu/ hardy-proposed main restricted universe multiverse

ubuntu.cnsite.org更新服务器(福建省福州市 电信):

deb http://ubuntu.cnsite.org/ubuntu/ hardy main restricted universe multiverse
deb-src http://ubuntu.cnsite.org/ubuntu/ hardy main restricted universe multiverse
deb http://ubuntu.cnsite.org/ubuntu/ hardy-updates main restricted universe multiverse
deb-src http://ubuntu.cnsite.org/ubuntu/ hardy-updates main restricted universe multiverse
deb http://ubuntu.cnsite.org/ubuntu/ hardy-backports main restricted universe multiverse
deb-src http://ubuntu.cnsite.org/ubuntu/ hardy-backports main restricted universe multiverse
deb http://ubuntu.cnsite.org/ubuntu/ hardy-security main restricted universe multiverse
deb-src http://ubuntu.cnsite.org/ubuntu/ hardy-security main restricted universe multiverse
deb http://ubuntu.cnsite.org/ubuntu/ hardy-proposed main multiverse restricted universe
deb-src http://ubuntu.cnsite.org/ubuntu/ hardy-proposed main restricted universe multiverse

mirror.rootguide.org更新服务器(上海市 电信):

deb http://mirror.rootguide.org/ubuntu/ hardy main restricted universe multiverse
deb-src http://mirror.rootguide.org/ubuntu/ hardy main restricted universe multiverse
deb http://mirror.rootguide.org/ubuntu/ hardy-updates main restricted universe multiverse
deb-src http://mirror.rootguide.org/ubuntu/ hardy-updates main restricted universe multiverse
deb http://mirror.rootguide.org/ubuntu/ hardy-backports main restricted universe multiverse
deb-src http://mirror.rootguide.org/ubuntu/ hardy-backports main restricted universe multiverse
deb http://mirror.rootguide.org/ubuntu/ hardy-security main restricted universe multiverse
deb-src http://mirror.rootguide.org/ubuntu/ hardy-security main restricted universe multiverse
deb http://mirror.rootguide.org/ubuntu/ hardy-proposed main multiverse restricted universe
deb-src http://mirror.rootguide.org/ubuntu/ hardy-proposed main restricted universe multiverse
deb http://mirror.rootguide.org/ubuntu-cn/ hardy main restricted universe multiverse

台湾的官方源速度也相当不错,有时甚至快于内地的:

deb http://tw.archive.ubuntu.com/ubuntu hardy main restricted universe multiverse
deb http://tw.archive.ubuntu.com/ubuntu hardy-security main restricted universe multiverse
deb http://tw.archive.ubuntu.com/ubuntu hardy-updates main restricted universe multiverse
deb http://tw.archive.ubuntu.com/ubuntu hardy-backports main restricted universe multiverse
deb http://tw.archive.ubuntu.com/ubuntu hardy-proposed main restricted universe multiverse
deb-src http://tw.archive.ubuntu.com/ubuntu hardy main restricted universe multiverse
deb-src http://tw.archive.ubuntu.com/ubuntu hardy-security main restricted universe multiverse
deb-src http://tw.archive.ubuntu.com/ubuntu hardy-updates main restricted universe multiverse
deb-src http://tw.archive.ubuntu.com/ubuntu hardy-backports main restricted universe multiverse
deb-src http://tw.archive.ubuntu.com/ubuntu hardy-proposed main restricted universe multiverse

用之前请ping一下源,测试下网速和可用性。

加源方法:打开终端-sudo gedit /etc/apt/sources.list
输入密码(你安装系统时设置的用户密码),注意密码不会显示,直接回车
把弹出的里面的内容全部清空,然后把提供的源全部粘贴上去(不含中文)
保存,关闭回到终端
输入sudo apt-get update

epoll的实现原理

Posted by 冰河 at 21:47 No Responses » 8,688 Views
十二 182009

1 功能介绍
epoll与select/poll不同的一点是,它是由一组系统调用组成。
int epoll_create(int size);
int epoll_ctl(int epfd, int op, int fd, struct epoll_event *event);
int epoll_wait(int epfd, struct epoll_event *events,
int maxevents, int timeout);
epoll相关系统调用是在Linux 2.5.44开始引入的。该系统调用针对传统的selec
t/poll系统调用的不足,设计上作了很大的改动。select/poll的缺点在于:
1.每次调用时要重复地从用户态读入参数。
2.每次调用时要重复地扫描文件描述符。
3.每次在调用开始时,要把当前进程放入各个文件描述符的等待队列。在调用结
束后,又把进程从各个等待队列中删除。
在实际应用中,select/poll监视的文件描述符可能会非常多,如果每次只是返回
一小部分,那么,这种情况下select/poll显得不够高效。epoll的设计思路,是把s
elect/poll单个的操作拆分为1个epoll_create+多个epoll_ctrl+一个wait。此外,
内核针对epoll操作添加了一个文件系统”eventpollfs”,每一个或者多个要监视的
文件描述符都有一个对应的eventpollfs文件系统的inode节点,主要信息保存在eve
ntpoll结构体中。而被监视的文件的重要信息则保存在epitem结构体中。所以他们
是一对多的关系。
由于在执行epoll_create和epoll_ctrl时,已经把用户态的信息保存到内核态了
,所以之后即使反复地调用epoll_wait,也不会重复地拷贝参数,扫描文件描述符,
反复地把当前进程放入/放出等待队列。这样就避免了以上的三个缺点。
接下去看看它们的实现:
2 关键结构体:
/* Wrapper struct used by poll queueing */
struct ep_pqueue {
poll_table pt;
struct epitem *epi;
};
这个结构体类似于select/poll中的struct poll_wqueues。由于epoll需要在内核
态保存大量信息,所以光光一个回调函数指针已经不能满足要求,所以在这里引入了
一个新的结构体struct epitem。
/*
* Each file descriptor added to the eventpoll interface will
* have an entry of this type linked to the hash.
*/
struct epitem {
/* RB-Tree node used to link this structure to the eventpoll rb
-tree */
struct rb_node rbn;
红黑树,用来保存eventpoll
/* List header used to link this structure to the eventpoll rea
dy list */
struct list_head rdllink;
双向链表,用来保存已经完成的eventpoll
/* The file descriptor information this item refers to */
struct epoll_filefd ffd;
这个结构体对应的被监听的文件描述符信息
/* Number of active wait queue attached to poll operations */
int nwait;
poll操作中事件的个数
/* List containing poll wait queues */
struct list_head pwqlist;
双向链表,保存着被监视文件的等待队列,功能类似于select/poll中的poll_tab
le
/* The “container” of this item */
struct eventpoll *ep;
指向eventpoll,多个epitem对应一个eventpoll
/* The structure that describe the interested events and the so
urce fd */
struct epoll_event event;
记录发生的事件和对应的fd
/*
* Used to keep track of the usage count of the structure. This
avoids
* that the structure will desappear from underneath our proces
sing.
*/
atomic_t usecnt;
引用计数
/* List header used to link this item to the “struct file” item
s list */
struct list_head fllink;
双向链表,用来链接被监视的文件描述符对应的struct file。因为file里有f_ep
_link,用来保存所有监视这个文件的epoll节点
/* List header used to link the item to the transfer list */
struct list_head txlink;
双向链表,用来保存传输队列
/*
* This is used during the collection/transfer of events to use
rspace
* to pin items empty events set.
*/
unsigned int revents;
文件描述符的状态,在收集和传输时用来锁住空的事件集合
};
该结构体用来保存与epoll节点关联的多个文件描述符,保存的方式是使用红黑树
实现的hash表。至于为什么要保存,下文有详细解释。它与被监听的文件描述符一一
对应。
struct eventpoll {
/* Protect the this structure access */
rwlock_t lock;
读写锁
/*
* This semaphore is used to ensure that files are not removed
* while epoll is using them. This is read-held during the even
t
* collection loop and it is write-held during the file cleanup
* path, the epoll file exit code and the ctl operations.
*/
struct rw_semaphore sem;
读写信号量
/* Wait queue used by sys_epoll_wait() */
wait_queue_head_t wq;
/* Wait queue used by file->poll() */
wait_queue_head_t poll_wait;
/* List of ready file descriptors */
struct list_head rdllist;
已经完成的操作事件的队列。
/* RB-Tree root used to store monitored fd structs */
struct rb_root rbr;
保存epoll监视的文件描述符
};
这个结构体保存了epoll文件描述符的扩展信息,它被保存在file结构体的priva
te_data中。它与epoll文件节点一一对应。通常一个epoll文件节点对应多个被监视
的文件描述符。所以一个eventpoll结构体会对应多个epitem结构体。
那么,epoll中的等待事件放在哪里呢?见下面
/* Wait structure used by the poll hooks */
struct eppoll_entry {
/* List header used to link this structure to the “struct epite
m” */
struct list_head llink;
/* The “base” pointer is set to the container “struct epitem” *
/
void *base;
/*
* Wait queue item that will be linked to the target file wait
* queue head.
*/
wait_queue_t wait;
/* The wait queue head that linked the “wait” wait queue item *
/
wait_queue_head_t *whead;
};
与select/poll的struct poll_table_entry相比,epoll的表示等待队列节点的结
构体只是稍有不同,与struct poll_table_entry比较一下。
struct poll_table_entry {
struct file * filp;
wait_queue_t wait;
wait_queue_head_t * wait_address;
};
由于epitem对应一个被监视的文件,所以通过base可以方便地得到被监视的文件
信息。又因为一个文件可能有多个事件发生,所以用llink链接这些事件。
3 epoll_create的实现
epoll_create()的功能是创建一个eventpollfs文件系统的inode节点。具体由ep
_getfd()完成。ep_getfd()先调用ep_eventpoll_inode()创建一个inode节点,然后
调用d_alloc()为inode分配一个dentry。最后把file,dentry,inode三者关联起来。
在执行了ep_getfd()之后,它又调用了ep_file_init(),分配了eventpoll结构体
,并把eventpoll的指针赋给file结构体,这样eventpoll就与file结构体关联起来了

需要注意的是epoll_create()的参数size实际上只是起参考作用,只要它不小于
等于0,就并不限制这个epoll inode关联的文件描述符数量。
4 epoll_ctl的实现
epoll_ctl的功能是实现一系列操作,如把文件与eventpollfs文件系统的inode节
点关联起来。这里要介绍一下eventpoll结构体,它保存在file->f_private中,记录
了eventpollfs文件系统的inode节点的重要信息,其中成员rbr保存了该epoll文件节
点监视的所有文件描述符。组织的方式是一棵红黑树,这种结构体在查找节点时非常
高效。
首先它调用ep_find()从eventpoll中的红黑树获得epitem结构体。然后根据op参
数的不同而选择不同的操作。如果op为EPOLL_CTL_ADD,那么正常情况下epitem是不
可能在eventpoll的红黑树中找到的,所以调用ep_insert创建一个epitem结构体并插
入到对应的红黑树中。
ep_insert()首先分配一个epitem对象,对它初始化后,把它放入对应的红黑树。
此外,这个函数还要作一个操作,就是把当前进程放入对应文件操作的等待队列。这
一步是由下面的代码完成的。
init_poll_funcptr(&epq.pt, ep_ptable_queue_proc);
。。。
revents = tfile->f_op->poll(tfile, &epq.pt);
函数先调用init_poll_funcptr注册了一个回调函数 ep_ptable_queue_proc,这
个函数会在调用f_op->poll时被执行。该函数分配一个epoll等待队列结点eppoll_e
ntry:一方面把它挂到文件操作的等待队列中,另一方面把它挂到epitem的队列中
。此外,它还注册了一个等待队列的回调函数ep_poll_callback。当文件操作完成,
唤醒当前进程之前,会调用ep_poll_callback(),把eventpoll放到epitem的完成队
列中,并唤醒等待进程。
如果在执行f_op->poll以后,发现被监视的文件操作已经完成了,那么把它放在
完成队列中了,并立即把等待操作的那些进程唤醒。
5 epoll_wait的实现
epoll_wait的工作是等待文件操作完成并返回。
它的主体是ep_poll(),该函数在for循环中检查epitem中有没有已经完成的事件
,有的话就把结果返回。没有的话调用schedule_timeout()进入休眠,直到进程被再
度唤醒或者超时。
6 性能分析
epoll机制是针对select/poll的缺陷设计的。通过新引入的eventpollfs文件系统
,epoll把参数拷贝到内核态,在每次轮询时不会重复拷贝。通过把操作拆分为epol
l_create,epoll_ctl,epoll_wait,避免了重复地遍历要监视的文件描述符。此外,
由于调用epoll的进程被唤醒后,只要直接从epitem的完成队列中找出完成的事件,
找出完成事件的复杂度由O(N)降到了O(1)。
但是epoll的性能提高是有前提的,那就是监视的文件描述符非常多,而且每次完
成操作的文件非常少。所以,epoll能否显著提高效率,取决于实际的应用场景。这
方面需要进一步测试。

Nginx PHP No input file specified

Posted by 冰河 at 21:45 No Responses » 24,676 Views
十二 182009

刚装好Nginx,马上加了个 PHPINFO

  1. <?php
  2. phpinfo();
  3. ?>

然后在游览器下运行 结果是

No input file specified.

以下内容为网络收集

FastCGI模式下访问php文件时,出现No input file specified.错误
查看access.log 发现是 404

原因分析:
任何对.php文件的请求,都简单地交给php-cgi去处理,但没有验证该php文件是否存在。PHP文件不存在,没办法返回普通的404错误,它返回一个404,并带上一句”No input file specified”

另外,还可能跟 路径或者 权限有关系,或者SCRIPT_FILENAME 变量没有被正确的设置(这在nginx是最常见的原因)

1)如果html也出现404错误,那么就是document root 设置的有问题
2)检查脚本文件的权限, 可能PHP或者web server不能读取它
3)SCRIPT_FILENAME设置错误

可以使用
fastcgi_param SCRIPT_FILENAME $document_root$fastcgi_script_name;
必须保证 $document_root 在配置文件中,在astcgi_param SCRIPT_FILENAME前面被用到过一次, 后面有解释为什么。

或者
修改/etc/php5/cgi/php.ini中cgi.fix_pathinfo=1
这样也可让php-cgi正常使用SCRIPT_FILENAME这个变量

有人说,这样改也行
fastcgi_param SCRIPT_NAME /home/gavin/nginx/$fastcgi_script_name;

让我们看看PHP对这两个变量是怎么解释的吧
SCRIPT_NAME
SCRIPT_FILENAME
据说,必须指定正确的SCRIPT_FILENAME, PHP-CGI会忽略SCRIPT_NAME(即使它的值设置的是正确的)
或者指定特殊的php.ini, 设置doc_root, discard path, fix pathinfo等等

script_filename 只是被用做一种快捷方式。 如果fix_pathinfo设置打开,init函数将它用来决定真实的路径

因为配置文件会改变 nginx的变量$fastcgi_script_name

fastcgi_param SCRIPT_NAME /home/gavin/nginx/$fastcgi_script_name;
fastcgi_param SCRIPT_FILENAME $fastcgi_script_name;

fastcgi_param SCRIPT_FILENAME /home/gavin/nginx/$fastcgi_script_name;
fastcgi_param SCRIPT_NAME $fastcgi_script_name;

这两种配置都是可以的


fastcgi_param SCRIPT_FILENAME $document_root$fastcgi_script_name;
也是可以的,但必须保证 $document_root 被正确设置过

‘SCRIPT_FILENAME’
当前执行脚本的绝对路径名(pathname)
‘SCRIPT_NAME’
含有当前脚本的路径。当页面需要指向他们自己时,有用. __FILE__ 常量包含路径和文件名

; cgi.fix_pathinfo provides *real* PATH_INFO/PATH_TRANSLATED support for CGI. PHP’s
; previous behaviour was to set PATH_TRANSLATED to SCRIPT_FILENAME, and to not grok
; what PATH_INFO is. For more information on PATH_INFO, see the cgi specs. Setting
; this to 1 will cause PHP CGI to fix it’s paths to conform to the spec. A setting
; of zero causes PHP to behave as before. Default is 1. You should fix your scripts
; to use SCRIPT_FILENAME rather than PATH_TRANSLATED.
; cgi.fix_pathinfo=0

主要跟CGI标准的
PATH_INFO
PATH_TRANSLATED
SCRIPT_NAME
有关系
修修改了好多
最终主要修改的

把 NGINX DEFAULT 那个文件中的

fastcgi_param SCRIPT_NAME $fastcgi_script_name;

改成实际的路径

今天我是这种情况

我的是fastcgi_param SCRIPT_NAME /var/www/nginx-default/$fastcgi_script_name;

然后就好了
上面的文章供参考
如果试了还不行 多看看内容再试试

十二 182009

一、sysv-rc-conf简介
sysv-rc-conf是一个强大的服务管理程序,群众的意见是sysv-rc-conf比chkconfig、rcconf好用。
二、背景知识
1、Ubuntu运行级别
Linux 系统任何时候都运行在一个指定的运行级上,并且不同的运行级的程序和服务都不同,所要完成的工作和要达到的目的都不同,系统可以在这些运行
级之间进行切换,以完成不同的工作。
Ubuntu 的系统运行级别:
0 系统停机状态
1 单用户或系统维护状态
2~5 多用户状态
6 重新启动
查看当前运行级别,执行命令:
runlevel
( runlevel 显示上次的运行级别和当前的运行级别,“N”表示没有上次的运行级别。)
切换运行级别,执行命令:
int [0123456Ss]
( 即在 init 命令后跟一个参数,此参数是要切换到的运行级的运行级代号,如:用 init 0 命令关机;用 init 6 命令重新启动。)
Linux 系统主要启动步骤:
1. 读取 MBR 的信息,启动 Boot Manager
Windows 使用 NTLDR 作为 Boot Manager,如果您的系统中安装多个
版本的 Windows,您就需要在 NTLDR 中选择您要进入的系统。
Linux 通常使用功能强大,配置灵活的 GRUB 作为 Boot Manager。
2. 加载系统内核,启动 init 进程
init 进程是 Linux 的根进程,所有的系统进程都是它的子进程。
3. init 进程读取 /etc/inittab 文件中的信息,并进入预设的运行级别,
按顺序运行该运行级别对应文件夹下的脚本。脚本通常以 start 参数启
动,并指向一个系统中的程序。
通常情况下, /etc/rcS.d/ 目录下的启动脚本首先被执行,然后是
/etc/rcN.d/ 目录。例如您设定的运行级别为 3,那么它对应的启动
目录为 /etc/rc3.d/ 。
4. 根据 /etc/rcS.d/ 文件夹中对应的脚本启动 Xwindow 服务器 xorg
Xwindow 为 Linux 下的图形用户界面系统。
5. 启动登录管理器,等待用户登录
Ubuntu 系统默认使用 GDM 作为登录管理器,您在登录管理器界面中
输入用户名和密码后,便可以登录系统。(您可以在 /etc/rc3.d/
文件夹中找到一个名为 S13gdm 的链接)
三、安装sysv-rc-conf
sudo apt-get install sysv-rc-conf
四、使用sysv-rc-conf
sudo sysv-rc-conf
操作界面十分简洁,你可以用鼠标点击,也可以用键盘方向键定位,用空格键选择,用Ctrl+N翻下一页,用Ctrl+P翻上一页,用Q退出。
常见的系统服务有:
acpi-support 高级电源管理支持
acpid acpi 守护程序.这两个用于电源管理,非常重要
alsa 声音子系统
alsa-utils
anacron cron 的子系统,将系统关闭期间的计划任务,在下一次系统运行时执行。
apmd acpi 的扩展
atd 类似于 cron 的任务调度系统。建议关闭
binfmt-support 核心支持其他二进制的文件格式。建议开启
bluez-utiles 蓝牙设备支持
bootlogd 启动日志。开启它
cron 任务调度系统,建议开启
cupsys 打印机子系统。
dbus 消息总线系统(message bus system)。非常重要
dns-clean 使用拨号连接时,清除 dns 信息。
evms 企业卷管理系统(Enterprise Volumn Management system)
fetchmail 邮件用户代理守护进程,用于收取邮件
gdm gnome 登录和桌面管理器。
gdomap
gpm 终端中的鼠标支持。
halt 别动它。
hdparm 调整硬盘的脚本,配置文件为 /etc/hdparm.conf。
hibernate 系统休眠
hotkey-setup 笔记本功能键支持。支持类型包括: HP, Acer, ASUS, Sony,Dell, 和 IBM。
hotplug and hotplug-net 即插即用支持,比较复杂,建议不要动它。
hplip HP 打印机和图形子系统
ifrename 网络接口重命名脚本。如果您有十块网卡,您应该开启它
inetd 在文件 /etc/inetd.conf 中,注释掉所有你不需要的服务。如果该文件不包含任何服务,那关闭它是很安全的。
klogd 重要。
linux-restricted-modules-common 受限模块支持。
/lib/linux-restricted-modules/ 文件夹中的模块为受限模块。例如某些驱动程序,如果您没有使用受限模块,就不需要开启它。
lvm 逻辑卷管理系统支持。
makedev 创建设备文件,非常重要。
mdamd 磁盘阵列
module-init-tools 从/etc/modules 加载扩展模块,建议开启。
networking 网络支持。按 /etc/network/interfaces 文件预设激活网络,非常重要。
ntpdate 时间同步服务,建议关闭。
pcmcia pcmcia 设备支持。
powernowd 移动 CPU 节能支持
ppp and ppp-dns 拨号连接
readahead 预加载库文件。
reboot 别动它。
resolvconf 自动配置 DNS
rmnologin 清除 nologin
rsync rsync 守护程序
sendsigs 在重启和关机期间发送信号
single 激活单用户模式
ssh ssh 守护程序。建议开启
stop-bootlogd 在 2,3,4,5 运行级别中停止 bootlogd 服务
sudo 检查 sudo 状态。重要
sysklogd 系统日志
udev & udev-mab 用户空间 dev 文件系统(userspace dev filesystem)。重要
umountfs 卸载文件系统
urandom 随机数生成器
usplash 开机画面支持
vbesave 显卡 BIOS 配置工具。保存显卡的状态
xorg-common 设置 X 服务 ICE socket。
adjtimex 调整核心时钟的工具
dirmngr 证书列表管理工具,和 gnupg 一起工作。
hwtools irqs 优化工具
libpam-devperm 系统崩溃之后,用于修理设备文件许可的守护程序。
lm-sensors 板载传感器支持
mdadm-raid 磁盘陈列管理器
screen-cleanup 清除开机屏幕的脚本
xinetd 管理其他守护进程的一个 inetd 超级守护程序

© 2009 - 2024 冰河的博客